


In today's ever-changing world of web development, it has become more and more common to see artificial intelligence integrated into applications. One particularly interesting application of AI is the creation of chatbots that can engage users in natural language conversations. In this tutorial, we will explore how to build a chatbot using JavaScript and harness the impressive capabilities of OpenAI's GPT-3.5 Turbo model for generating intelligent responses.
github repo : - https://github.com/RtjShreyD/excelus_embedded_chat/tree/widget
Prerequisites
Before diving into the implementation, ensure you have the following prerequisites:
Node.js installed on your system.
An OpenAI API key. Set this key in an environment variable named
OPEN_API_KEY.
Setting up the Node.js Environment
To manage our project dependencies and configure our Node.js environment, we'll create a package.json file. This file serves as the entry point for Node.js projects and contains metadata about the project.
Initialize Node.js Project:
Open your terminal and navigate to your project's root directory. Run the following command to initialize a new Node.js project:
npm init -y
Getting Started
Let's start by setting up the project structure and creating the essential files.
Project Structure:
/chatbot
 ├── public
      ├── index.html
      ├── main.css
      ├── script.js
  ├── app.js
  ├── .env
  ├── package.json
  └── node_modules
HTML Structure (index.html) :
We will start by creating our index.html in the public directory, which defines the basic structure of our chatbot.
<!DOCTYPE html>
<html lang="en">
<head>
<meta charset="utf-8">
<title>Chatbot in JavaScript</title>
<link rel="stylesheet" href="main.css">
<meta name="viewport" content="width=device-width, initial-scale=1.0">
<link rel="stylesheet" href="https://fonts.googleapis.com/css2?family=Material+Symbols+Outlined:opsz,wght,FILL,GRAD@48,400,0,0" />
<link rel="stylesheet" href="https://fonts.googleapis.com/css2?family=Material+Symbols+Rounded:opsz,wght,FILL,GRAD@48,400,1,0" />
<script src="script.js" defer></script>
</head>
<body>
<button class="chatbot-toggler">
<span class="material-symbols-rounded">mode_comment</span>
<span class="material-symbols-outlined">close</span>
</button>
<div class="chatbot">
<header>
<h2>Chatbot</h2>
<span class="close-btn material-symbols-outlined">close</span>
</header>
<ul class="chatbox">
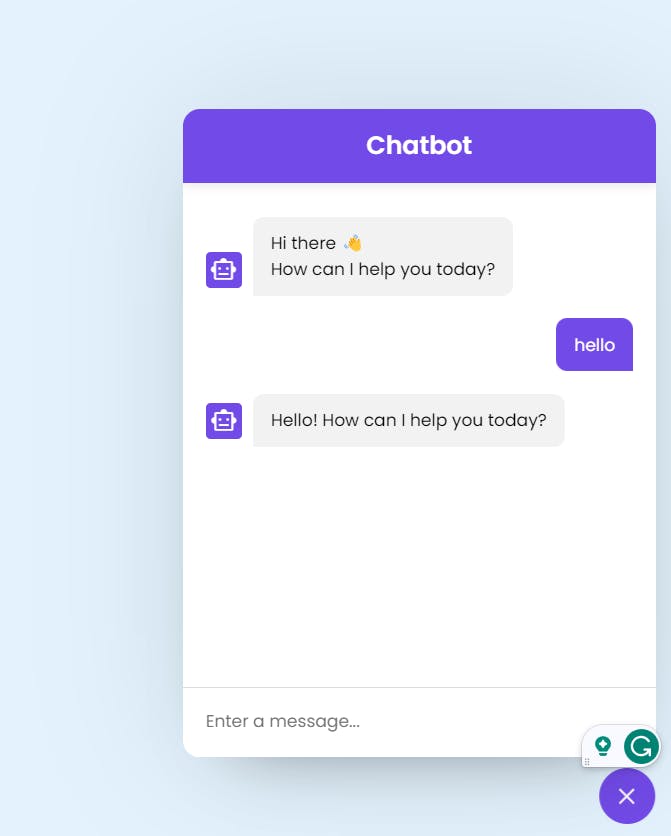
<li class="chat incoming">
<span class="material-symbols-outlined">smart_toy</span>
<p>Hi there 👋<br>How can I help you today?</p>
</li>
</ul>
<div class="chat-input">
<textarea placeholder="Enter a message..." spellcheck="false" required></textarea>
<span id="send-btn" class="material-symbols-rounded">send</span>
</div>
</div>
</body>
</html>
CSS Styling (main.css) :
Look and feel of our chatbot is quite important for which we are adding some styles and fonts using custom defined CSS.
/* Import Google font - Poppins */
@import url('https://fonts.googleapis.com/css2?family=Poppins:wght@400;500;600&display=swap');
* {
  margin: 0;
  padding: 0;
  box-sizing: border-box;
  font-family: "Poppins", sans-serif;
}

.chatbot-toggler {
  position: fixed;
  bottom: 30px;
  right: 35px;
  outline: none;
  border: none;
  height: 50px;
  width: 50px;
  display: flex;
  cursor: pointer;
  align-items: center;
  justify-content: center;
  border-radius: 50%;
  background: #724ae8;
  transition: all 0.2s ease;
}
body.show-chatbot .chatbot-toggler {
  transform: rotate(90deg);
}
.chatbot-toggler span {
  color: #fff;
  position: absolute;
}
.chatbot-toggler span:last-child,
body.show-chatbot .chatbot-toggler span:first-child  {
  opacity: 0;
}
body.show-chatbot .chatbot-toggler span:last-child {
  opacity: 1;
}
.chatbot {
  position: fixed;
  right: 35px;
  bottom: 90px;
  width: 420px;
  background: #fff;
  border-radius: 15px;
  overflow: hidden;
  opacity: 0;
  pointer-events: none;
  transform: scale(0.5);
  transform-origin: bottom right;
  box-shadow: 0 0 128px 0 rgba(0,0,0,0.1),
              0 32px 64px -48px rgba(0,0,0,0.5);
  transition: all 0.1s ease;
}
body.show-chatbot .chatbot {
  opacity: 1;
  pointer-events: auto;
  transform: scale(1);
}
.chatbot header {
  padding: 16px 0;
  position: relative;
  text-align: center;
  color: #fff;
  background: #724ae8;
  box-shadow: 0 2px 10px rgba(0,0,0,0.1);
}
.chatbot header span {
  position: absolute;
  right: 15px;
  top: 50%;
  display: none;
  cursor: pointer;
  transform: translateY(-50%);
}
header h2 {
  font-size: 1.4rem;
}
.chatbot .chatbox {
  overflow-y: auto;
  height: 510px;
  padding: 30px 20px 100px;
}
.chatbot :where(.chatbox, textarea)::-webkit-scrollbar {
  width: 6px;
}
.chatbot :where(.chatbox, textarea)::-webkit-scrollbar-track {
  background: #fff;
  border-radius: 25px;
}
.chatbot :where(.chatbox, textarea)::-webkit-scrollbar-thumb {
  background: #ccc;
  border-radius: 25px;
}
.chatbox .chat {
  display: flex;
  list-style: none;
}
.chatbox .outgoing {
  margin: 20px 0;
  justify-content: flex-end;
}
.chatbox .incoming span {
  width: 32px;
  height: 32px;
  color: #fff;
  cursor: default;
  text-align: center;
  line-height: 32px;
  align-self: flex-end;
  background: #724ae8;
  border-radius: 4px;
  margin: 0 10px 7px 0;
}
.chatbox .chat p {
  white-space: pre-wrap;
  padding: 12px 16px;
  border-radius: 10px 10px 0 10px;
  max-width: 75%;
  color: #fff;
  font-size: 0.95rem;
  background: #724ae8;
}
.chatbox .incoming p {
  border-radius: 10px 10px 10px 0;
}
.chatbox .chat p.error {
  color: #721c24;
  background: #f8d7da;
}
.chatbox .incoming p {
  color: #000;
  background: #f2f2f2;
}
.chatbot .chat-input {
  display: flex;
  gap: 5px;
  position: absolute;
  bottom: 0;
  width: 100%;
  background: #fff;
  padding: 3px 20px;
  border-top: 1px solid #ddd;
}
.chat-input textarea {
  height: 55px;
  width: 100%;
  border: none;
  outline: none;
  resize: none;
  max-height: 180px;
  padding: 15px 15px 15px 0;
  font-size: 0.95rem;
}
.chat-input span {
  align-self: flex-end;
  color: #724ae8;
  cursor: pointer;
  height: 55px;
  display: flex;
  align-items: center;
  visibility: hidden;
  font-size: 1.35rem;
}
.chat-input textarea:valid ~ span {
  visibility: visible;
}

@media (max-width: 490px) {
  .chatbot-toggler {
    right: 20px;
    bottom: 20px;
  }
  .chatbot {
    right: 0;
    bottom: 0;
    height: 100%;
    border-radius: 0;
    width: 100%;
  }
  .chatbot .chatbox {
    height: 90%;
    padding: 25px 15px 100px;
  }
  .chatbot .chat-input {
    padding: 5px 15px;
  }
  .chatbot header span {
    display: block;
  }
}
Javascript (script.js) :
Now we will add some frontend javascript which will actually make API calls to the openai API in this use-case or any other custom API can also be called from here.
const chatbotToggler = document.querySelector(".chatbot-toggler");
const closeBtn = document.querySelector(".close-btn");
const chatbox = document.querySelector(".chatbox");
const chatInput = document.querySelector(".chat-input textarea");
const sendChatBtn = document.querySelector(".chat-input span");


let userMessage = null; // Variable to store user's message
const API_KEY = process.env.API_KEY; // Paste your API key here
const inputInitHeight = chatInput.scrollHeight;

const createChatLi = (message, className) => {
    // Create a chat <li> element with passed message and className
    const chatLi = document.createElement("li");
    chatLi.classList.add("chat", `${className}`);
    let chatContent = className === "outgoing" ? `<p></p>` : `<span class="material-symbols-outlined">smart_toy</span><p></p>`;
    chatLi.innerHTML = chatContent;
    chatLi.querySelector("p").textContent = message;
    return chatLi; // return chat <li> element
}

const generateResponse = (chatElement) => {
    const API_URL = "https://api.openai.com/v1/chat/completions";
    const messageElement = chatElement.querySelector("p");

    // Define the properties and message for the API request
    const requestOptions = {
        method: "POST",
        headers: {
            "Content-Type": "application/json",
            "Authorization": `Bearer ${API_KEY}`
        },
        body: JSON.stringify({
            model: "gpt-3.5-turbo",
            messages: [{role: "user", content: userMessage}],
        })
    }

    // Send POST request to API, get response and set the reponse as paragraph text
    fetch(API_URL, requestOptions).then(res => res.json()).then(data => {
        messageElement.textContent = data.choices[0].message.content.trim();
    }).catch(() => {
        messageElement.classList.add("error");
        messageElement.textContent = "Oops! Something went wrong. Please try again.";
    }).finally(() => chatbox.scrollTo(0, chatbox.scrollHeight));
}

const handleChat = () => {
    userMessage = chatInput.value.trim(); // Get user entered message and remove extra whitespace
    if(!userMessage) return;

    // Clear the input textarea and set its height to default
    chatInput.value = "";
    chatInput.style.height = `${inputInitHeight}px`;

    // Append the user's message to the chatbox
    chatbox.appendChild(createChatLi(userMessage, "outgoing"));
    chatbox.scrollTo(0, chatbox.scrollHeight);

    setTimeout(() => {
        // Display "Thinking..." message while waiting for the response
        const incomingChatLi = createChatLi("Thinking...", "incoming");
        chatbox.appendChild(incomingChatLi);
        chatbox.scrollTo(0, chatbox.scrollHeight);
        generateResponse(incomingChatLi);
    }, 600);
}

chatInput.addEventListener("input", () => {
    // Adjust the height of the input textarea based on its content
    chatInput.style.height = `${inputInitHeight}px`;
    chatInput.style.height = `${chatInput.scrollHeight}px`;
});

chatInput.addEventListener("keydown", (e) => {
    // If Enter key is pressed without Shift key and the window
    if(e.key === "Enter" && !e.shiftKey && window.innerWidth > 800) {
        e.preventDefault();
        handleChat();
    }
});

sendChatBtn.addEventListener("click", handleChat);
closeBtn.addEventListener("click", () => document.body.classList.remove("show-chatbot"));
chatbotToggler.addEventListener("click", () => document.body.classList.toggle("show-chatbot"));
Server Setup (app.js) :
Although our chatbot has more logics on the frontend but we do need a server to serve our static html, css and javascript files. We want our chatbot to be a re-usable application for which we need a Nodejs-ExpressJs server to host it. So lets create out app.js
const express = require('express');
const app = express();
const port = 3000;

app.use(express.static('public'));

app.listen(port, () => {
    console.log(`Server running at http://localhost:${port}`);
});
Installation and Configuration
Now, let's install the required dependencies and start the server:
npm install
node app.js
Visit http://localhost:3000 to see your chatbot in action!
Features of the Chatbot
1. AI-Powered Chatbot
Our chatbot leverages the OpenAI GPT-3.5 Turbo model, providing natural language responses to user input.
2. User-Friendly Interface
The chatbot offers an intuitive and responsive chat interface, enhancing the overall user experience.
3. Toggle Visibility
Users can easily show or hide the chatbot interface by clicking the chatbot-toggler button, providing flexibility in interaction.
Implementation Details
Let's delve into key aspects of the implementation:
API Key Security
Ensure to handle your OpenAI API key securely. Consider server-side handling or use environmental variables to protect sensitive information.
const API_KEY = process.env.OPEN_API_KEY || "YOUR_API_KEY";
Dynamic UI Elements
Utilize modern CSS features like flexbox and media queries to create a responsive and visually appealing chatbot interface.
/* Responsive design using media queries */
@media (max-width: 490px) {
    /* Mobile-friendly styles */
}
Asynchronous Requests
Make use of asynchronous JavaScript to handle user interactions and API requests without blocking the main thread.
fetch(API_URL, requestOptions)
   .then(res => res.json())
   .then(data => {
       // Handle API response
   })
   .catch(() => {
       // Handle errors
   });
Conclusion
Creating intelligent conversational agents becomes more exciting with the integration of AI-powered features into web applications using JavaScript and OpenAI GPT-3.5 Turbo. By following this tutorial, you have gained insights on how to build a chatbot using these technologies. You can now experiment, iterate and enhance your chatbot to suit specific use cases and engage users seamlessly. The combination of JavaScript's flexibility and the power of GPT-3.5 Turbo provides a robust foundation for creating cutting-edge conversational interfaces. So, happy coding and make the most out of this powerful combination! 🚀