


Playing around with HTTP
We will take up two practical examples of HTTP requests with ESP32, we will make GET and POST requests to a server and understand few things about it. Moreover in this blog post we will see why HTTP is the heart of all internet.
All we need to have is an ESP 32 dev-kit, laptop and internet to try this out. So lets get started.
I assume the readers have basic knowledge of Arduino IDE and ESP 32 dev-kit and its board setup in Arduino, if not then have a look here.
We will need a server to serve API end-points for our example, so we will find some free hosted REST API services for testing purposes. I have plans to cover on how to create an REST API server using Python and also Node-Red, but for now just type on Google "Rest api for testing", so many links will appear, or else lets try out with this one. In the bottom of the webpage opened when you click "this" above. there is a link of guide to usage examples. You can click here also to see.
GET request example
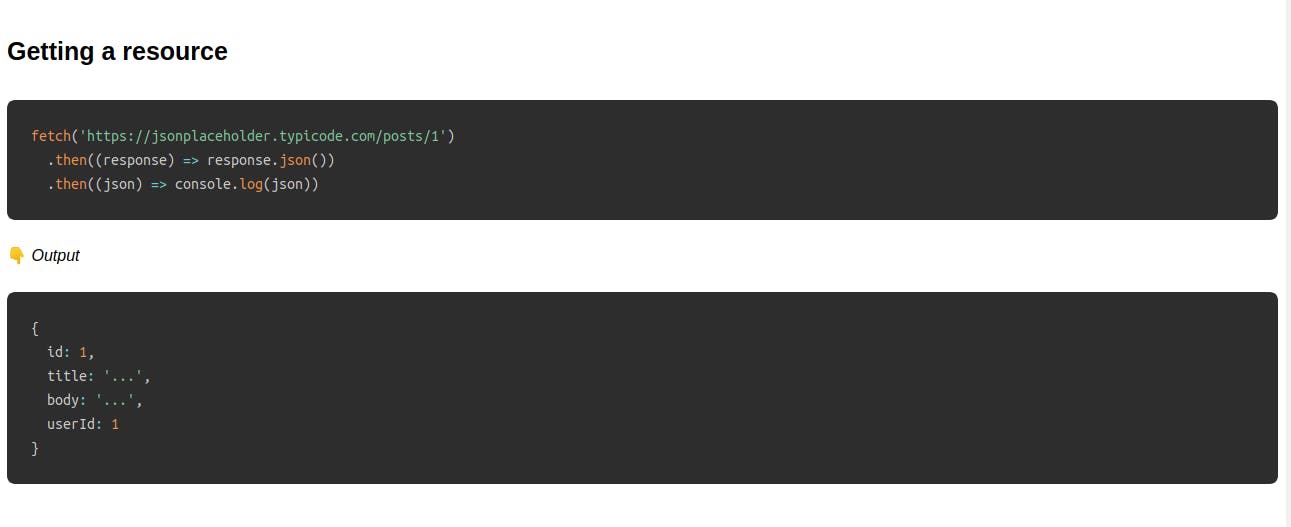
On the jsonplaceholder website usage usage example guide, we see the first API is "Getting a resource", see the image below,
 ,
,
Although the website shows a typical example of fetch() function of Javascript, but it hardly matters, as long as we know what we are doing. We can see the API endpoint inside the fetch() function in the image and we just need that !!. I'm sure by now ESP32 would be setup with Arduino IDE and WiFi is available, so let's have a look at the code,
/*
  Rtj@Tecelit
  Complete project details at https://tecelit.hashnode.dev/

  Permission is hereby granted, free of charge, to any person obtaining a copy
  of this software and associated documentation files.

  The above copyright notice and this permission notice shall be included in all
  copies or substantial portions of the Software.
*/


#include <WiFi.h>
#include <HTTPClient.h>

const char* ssid = "YOUR WIFI SSID";
const char* password = "YOUR WIFI PASSWORD";

String server = "http://jsonplaceholder.typicode.com/posts/1";

unsigned long previous = 0;
unsigned long _delay = 5000;

void setup()
{
  Serial.begin(115200);
  Internet();

  Serial.println("GET data from server every 5 seconds");
}


void Internet()
{

  WiFi.begin(ssid, password);
  Serial.println("Connecting");

  while(WiFi.status() != WL_CONNECTED)
  {
    delay(500);
    Serial.print(".");
  }

  Serial.println("");
  Serial.print("Connected to WiFi, IP Address: ");
  Serial.println(WiFi.localIP());


}


void loop()
{

  if ((millis() - previous) > _delay)
  {
    if(WiFi.status()== WL_CONNECTED)
    {
      HTTPClient http;

      String endpoint = server ;

      http.begin(endpoint.c_str());

      int httpCode = http.GET();

      if (httpCode > 0)
      {
        Serial.print("Response Code: ");
        Serial.println(httpCode);
        String payload = http.getString();
        Serial.println(payload);
      }

      else
      {
        Serial.print("Error code: ");
        Serial.println(httpCode);
      }

      http.end();
    }

    else
    {
      Serial.println("WiFi Disconnected");
    }

    previous = millis();

  }

}
Above is the full code and now lets understand how it works,
#include <WiFi.h>
#include <HTTPClient.h>

const char* ssid = "YOUR WIFI SSID";
const char* password = "YOUR WIFI PASSWORD";

String server = "http://jsonplaceholder.typicode.com/posts/1";

unsigned long previous = 0;
unsigned long _delay = 5000;
In the above snippet the #include statements are to include the WiFi.h and HTTPClient.h library, then wifi global variables are defined. Furthermore we have also defined the server with its endpoint. We also can see two long integers "previous" and "_delay", these are to control the timing between the requests.
We have then made the connect to Internet function as Internet(), through which initial void setup() has been done. Next comes void loop() where we can see an interesting technique,
void loop()
{

  if ((millis() - previous) > _delay)
  {
       /* Do something here */
  }
 previous = millis();
}
In the above code snipppet, the millis() returns the number of miliseconds passed since the program was run and millis() was encountered. We stored that into a variable called "previous", and ran it in loop with condition to make request to the server after every "_delay" time interval. And then stored the instantaneous seconds value before the loop executes the next cycle.
Upload the code to ESP32 and then on opening serial monitor we can see the response like the following,
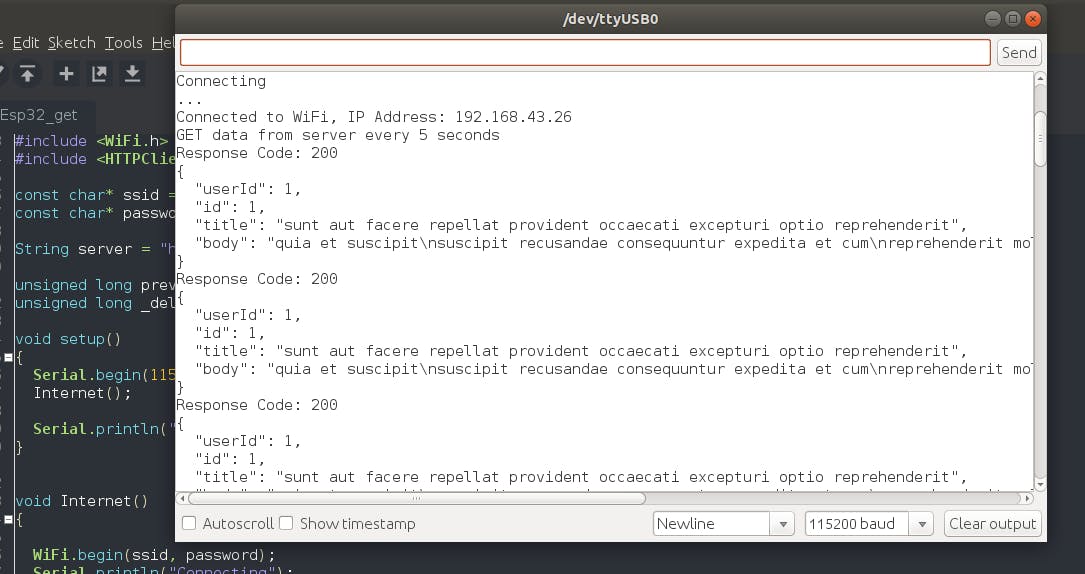
We sent a GET request on "jsonplaceholder.typicode.com/posts/1" and we get the posts detail as a JSON object response, from the server which fetches it from the database. We also see a HTTP response code 200, which means "OK", request was successfully executed and fulfilled.
Therefore, GET requests are used to get data from the server, however you can also send data along with the request, as a query. Look for query notation here.
POST request example
POST requests are also similar to GET but we can pack data as JSON object into the body of the request, and the request URL contains no extra query than the slug path. We shall see how, we will add a JSON Parser library called ArduinoJson library to our Arduino libraries and include it later in code. Install it from here. Next we have to have the API endpoint, because the POST API will have a different endpoint, lets check "jsonplaceholders website" again for the POST API, we can find an API as "Creating a resource", we just grab the endpoint and json data format from the tab below fetch() function on its website.
The json object we are dealing with here is as follows,
{
  id: 1,
  title: '...',
  body: '...',
  userId: 1
}
it has 4 fields, id, title, body and userId and in json we pack the values associated with each field in the above format, using ArduinoJson library. The serializeJson() function packs the data stored in each char arrays to a json object, as supported by the Api. Now the full code is following,
/*
  Rtj@Tecelit
  Complete project details at https://tecelit.hashnode.dev/

  Permission is hereby granted, free of charge, to any person obtaining a copy
  of this software and associated documentation files.

  The above copyright notice and this permission notice shall be included in all
  copies or substantial portions of the Software.
*/


#include <WiFi.h>
#include <HTTPClient.h>
#include <ArduinoJson.h>

String title = "";
String body = "";
int usr_id = 0;

const char* ssid = "YOUR WIFI SSID";
const char* password = "YOUR WIFI PASSWORD";

unsigned long previous = 0;
unsigned long _delay = 10000;

String service_name = "http://jsonplaceholder.typicode.com/posts";

void setup()
{
    Serial.begin(115200);
    Internet();
    delay(3000);
}

void Internet()
{

    WiFi.begin(ssid, password);
    Serial.println("Connecting");

    while(WiFi.status() != WL_CONNECTED)
    {
      delay(500);
      Serial.print(".");
    }

    Serial.println("");
    Serial.print("Connected to WiFi, IP Address: ");
    Serial.println(WiFi.localIP());

}


void loop()
{

  if ((millis() - previous) > _delay)
  {
    if(WiFi.status() == WL_CONNECTED)
    {
       HTTPClient http;
       DynamicJsonDocument doc(1024);
       String json;
       usr_id = random(0,50);

       doc["title"] = title;
       doc["body"] = body;
       doc["user_id"] = usr_id;

       //serializeJsonPretty(doc, Serial);
       serializeJson(doc, json);

       http.begin(service_name);
       http.addHeader("Content-Type", "application/json");
       int httpResponseCode = http.POST(json);

       if(httpResponseCode>0)
       {
         String response = http.getString();
         Serial.println(httpResponseCode);
         Serial.println(response);

       }

       else
       {
         Serial.printf("Error occurred while sending HTTP POST: %s\n", http.errorToString(httpResponseCode).c_str());

       }

       http.end();
    }

  }
}
The logic for POST is also the same as GET, send after every _delay number of milliseconds. Post requests are basically used to send data to server either to get stored in database or some further processing or even both depends upon what the server is programmed for. If everything ran successfully the output would be like the following,
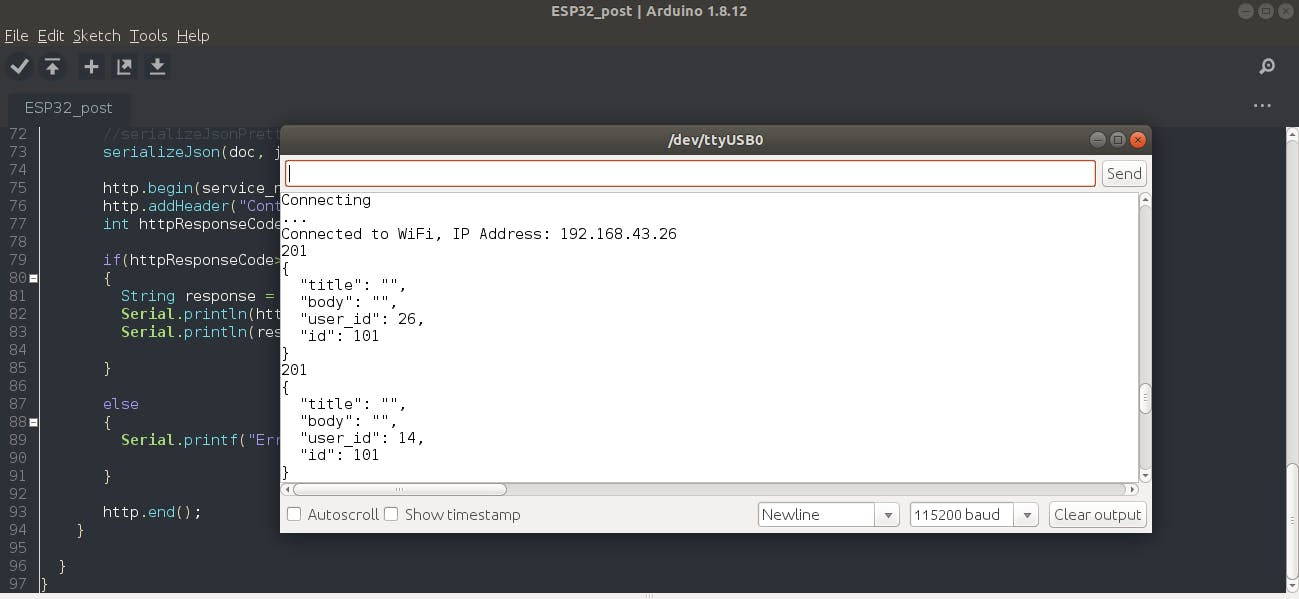
We packed the HTTP post operation in infinite loop which sends a post request every _delay number of milliseconds, and on each request we have changed the user Id, while packing data to JSON. The random() function used returns a random integer between min and max boundary points, we store this value to the user Id before packing to JSON.
Points of Asertion - What we know now ?
So we have seen examples of two most common type of requests GET and POST and we understand how HTTP works. However there are some key points to note down.
HTTP requests are short-lived connections, the connection only lasts till the request lasts
HTTP protocol remembers the address of the source of the request until it is completed.
HTTP always sends a response if the request ever reached the server, response could be 200, 201, or 404, 401, etc. Read more about HTTP responses from Google.
HTTP is quite fast.
HTTP endpoints here were unsecured, as they are public for anyone to use, but can be made secured too for only authorized devices or person to use. We will see it in detail when we make a server from scratch in a future Blog post.
These points we have written will be useful to make a good comparison with MQTT in the coming Parts of this Blog HTTP vs MQTT.